Foraging, Experimentation, and Hypochondria

Happy, slimy mushrooms

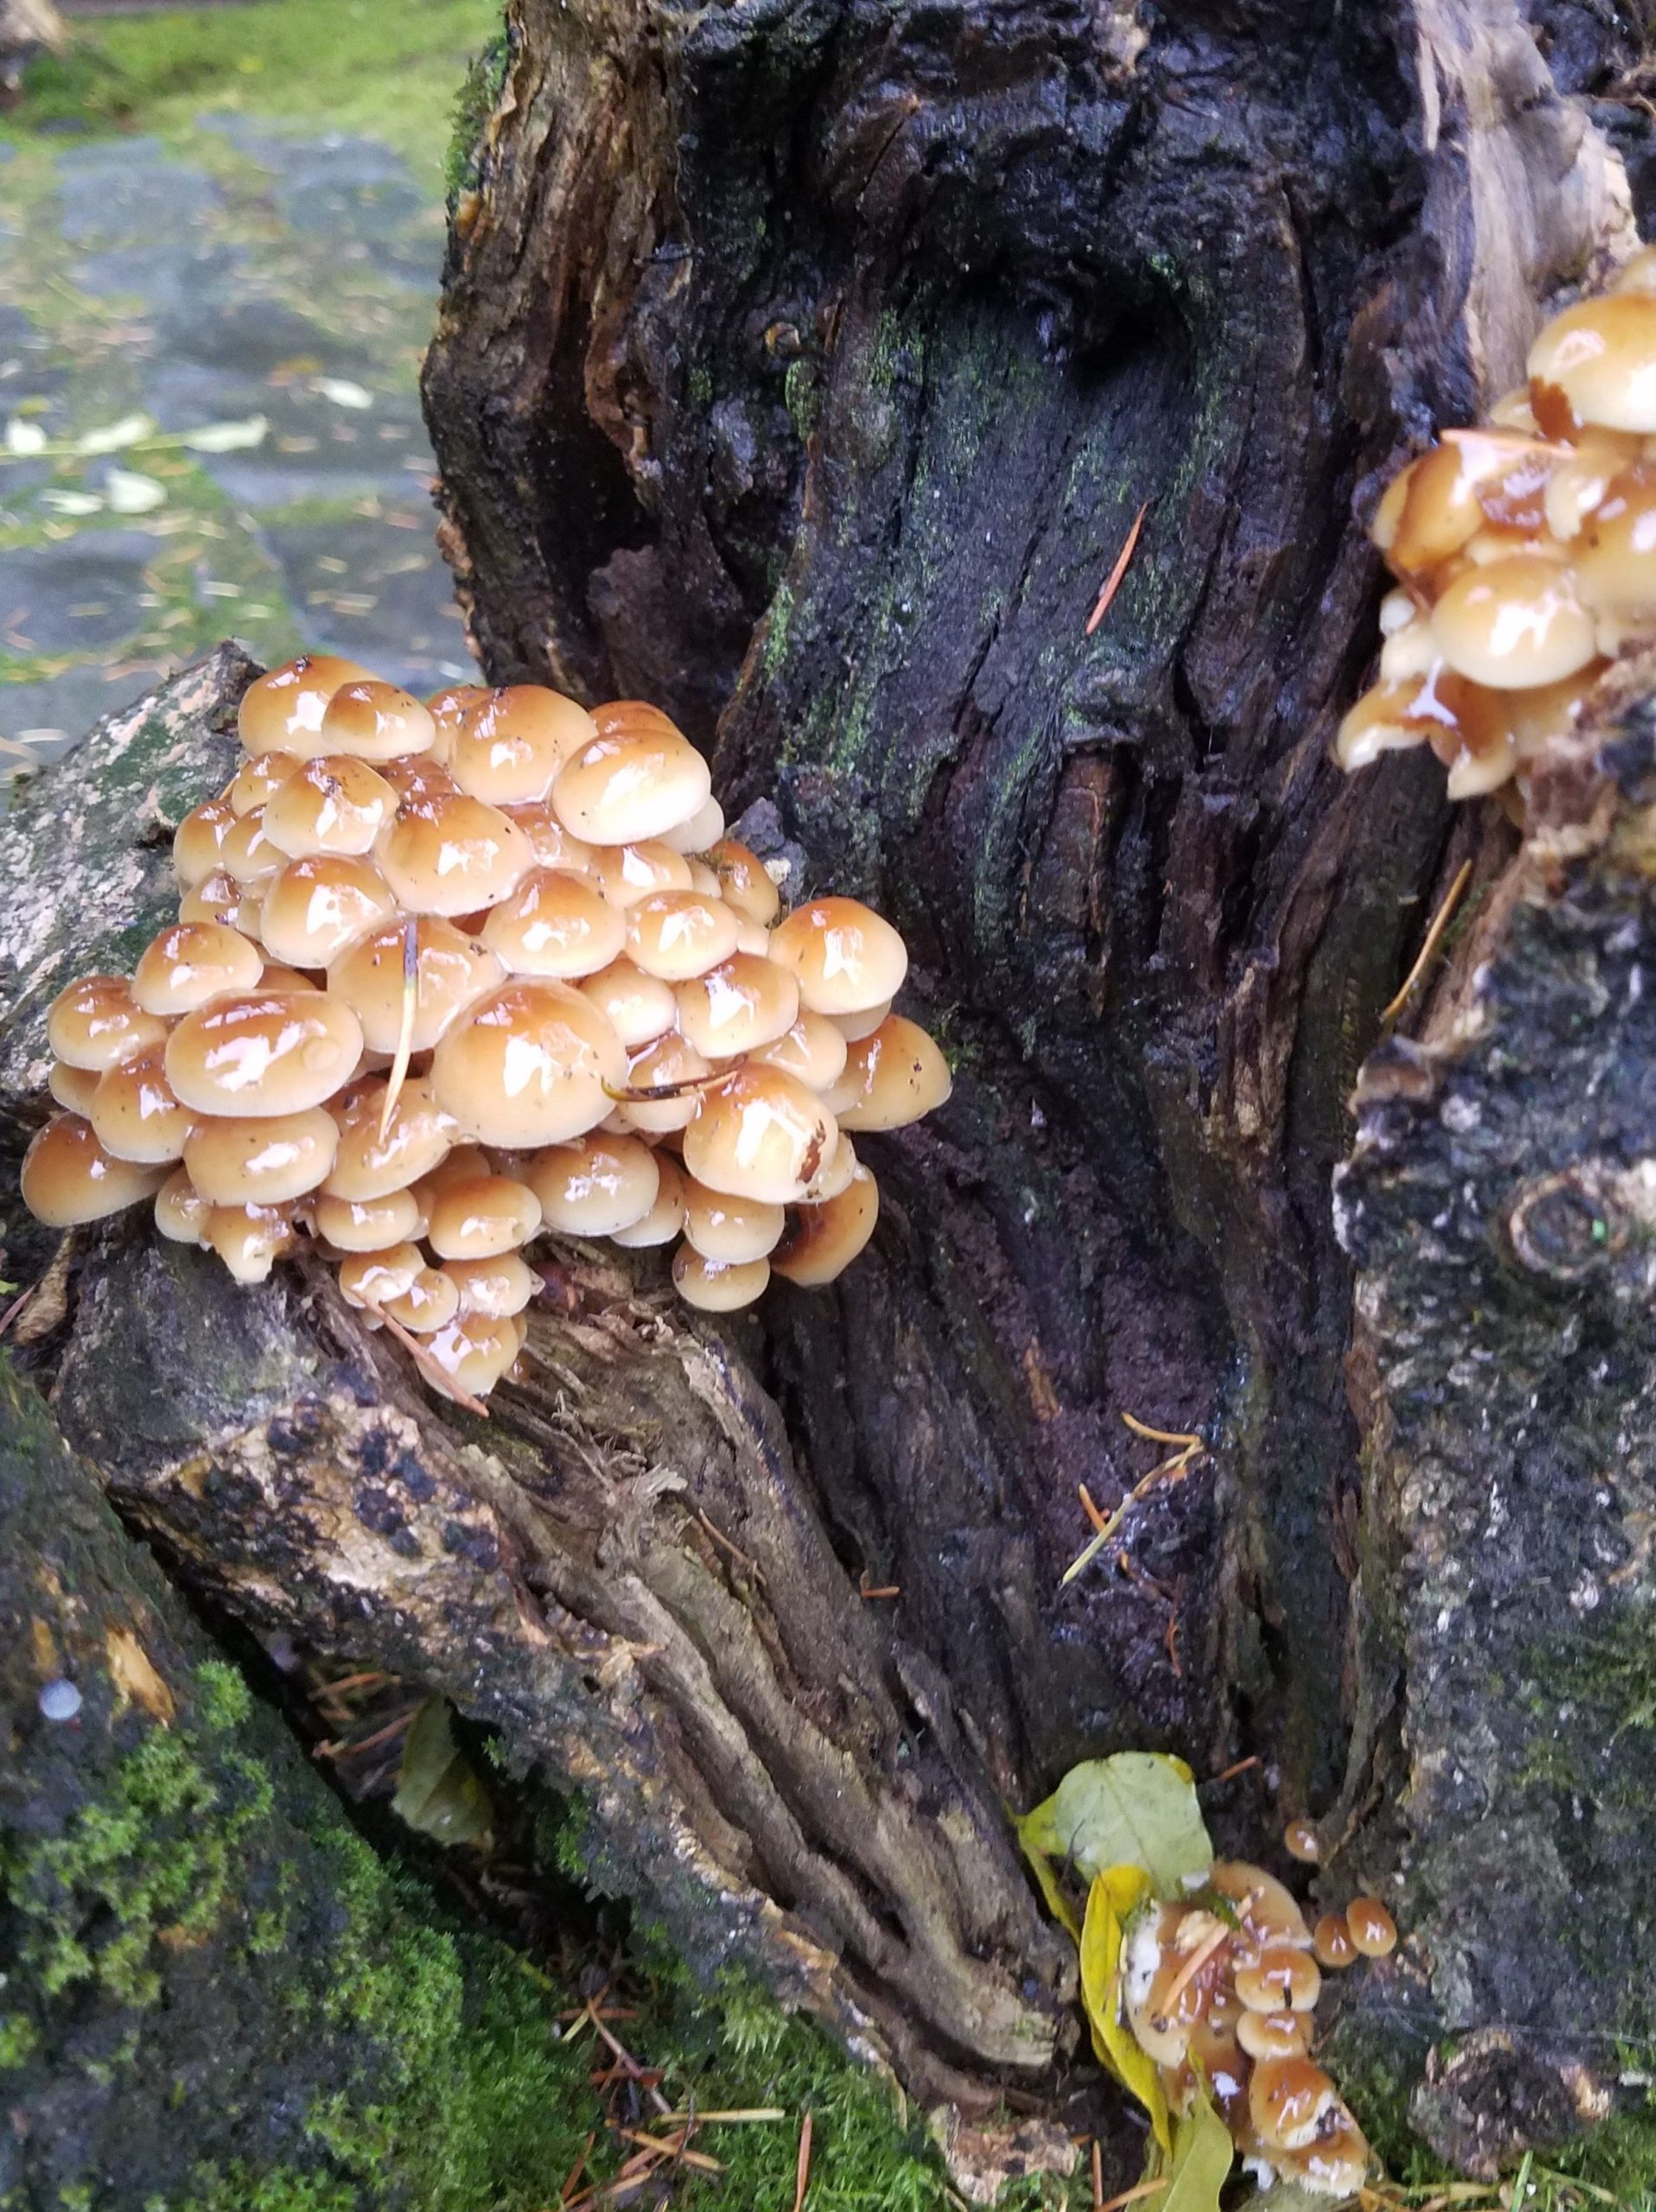
It is mushroom season in the Pacific Northwest, and I’m sad I’m not foraging in Oregon right now. Prior to our marriage, my husband and I moved to Portland for five months spanning the fall and winter, and I definitely miss our first few adventures in the forest there. I don’t miss the incessant darkness and rain, but I do miss the wildly vibrant moss carpeting the forest and the happy clusters of mushrooms everywhere.

I’ve always been fascinated by mushrooms, and I discovered a few years earlier that many species can be used to create natural dyes. Even when lightfast blues and greens are hard to come by from plant materials, mushrooms can produce the entire rainbow of color if you can locate the right species in the right quantity. Some take a bit of finesse to show their true colors – the right pH, the right temperature, the right weight to fiber ratio. Some don’t produce colors without a fermentation in ammonia first (and there is a whole community of people who prefer homegrown ammonia, i.e. stale pee, but I prefer to buy mine over the counter).

Dyeing small batches in mason jars can help when working with many mushrooms with different requirements
On the left, fiber dyed a light pink with a Cortinarius and tin, and on the right, fiber dyed a blue-grey with Hydnellum peckii and iron

The first step in dyeing with mushrooms and lichen is identification, and for that you need great notes, great resources, and some healthy caution. When we lived in Portland, I joined the Oregon Mycological Society and went on mushroom foraging and identification excursions with experts. I feel much more comfortable gaining a second opinion before working with anything, and it’s a necessity if I’ll be foraging for food. Many dye mushrooms are toxic – and some mushrooms are very deadly – so it is important to know what you’re working with. For example, the Cortinarius sanguineus, which I came across many times in the forests outside of Portland, produces a beautiful spectrum of orange to red dyes. It is also toxic (don’t eat your dye mushrooms). Conversely, many species of the Amanita genus are deadly, and they also don’t produce dye, so it’s best to avoid them altogether.

In Puerto Rico, however, my resources for a second opinion are limited. Hell, my resources for basic identification aren’t great either. There are dozens of wonderful field guides to mushrooms in the PNW, but I’ve yet to find one good resource for Puerto Rico. My best option has been the Hongos de Puerto Rico Facebook group wherein 90% of members are trying to forage for hallucinogenic shrooms and one man is solely responsible for helping to identify submissions based on pictures alone. Needless to say, it’s best to exercise caution under such circumstances.

I’m not a cautious person, necessarily, but I am an anxious one. I often do stupid things and then worry myself sick in anticipation of the consequences. While it is true that deadly mushrooms cannot hurt you by touch alone – they must be consumed and metabolized to do their damage – what if the dust of a dried mushroom goes up your nose? Well, after two days of feeling sick to my stomach post inhalation of some stored, bug-eaten mushroom and Googling every iteration of “toxic mushroom dust” imaginable, I’m pretty sure I will live to dye again. Though, one can never tell with these things. Sometimes it takes a few weeks for the toxins to settle in.

Don’t do what I do and write meaningless or cryptic notes on brown paper bags, thinking that you’ll follow up on identification later. You won’t.

If there is a lesson I can impart here, it is always, always wear protective gear when handling natural dyes and mordants, including a good particle mask. Always work in a well-ventilated area, preferably outdoors. Always rinse your fiber completely and dispose of the dyebath properly and away from pets. Many dyes and mordants are toxic, so follow the same general precautions as you would with any other natural dye. Also, identify your foraged materials to the best of your ability prior to storing, and label/document well.

Part of the process of identification is knowing what the mushroom was growing on or near. Sometimes, to tell look-alikes apart, it is essential to know where the specimen was found. Proper identification is also essential in reproducing results. You are unlikely to remember any details at all without good notes. I definitely slipped a bit with that in the case of my mushroom powder debacle, which is why I was so scared. I had identified it enough to determine that it was probably harmless and would probably produce dye, but I still don’t know the genus or species. I also did not take good photographs of it, so I could not go back and confirm what notes I did take. In the future, I will be better about this.

Two colors, one mushroom: Phaelous schweinitzii with tin produces gold, and with iron produces a complementary steely green

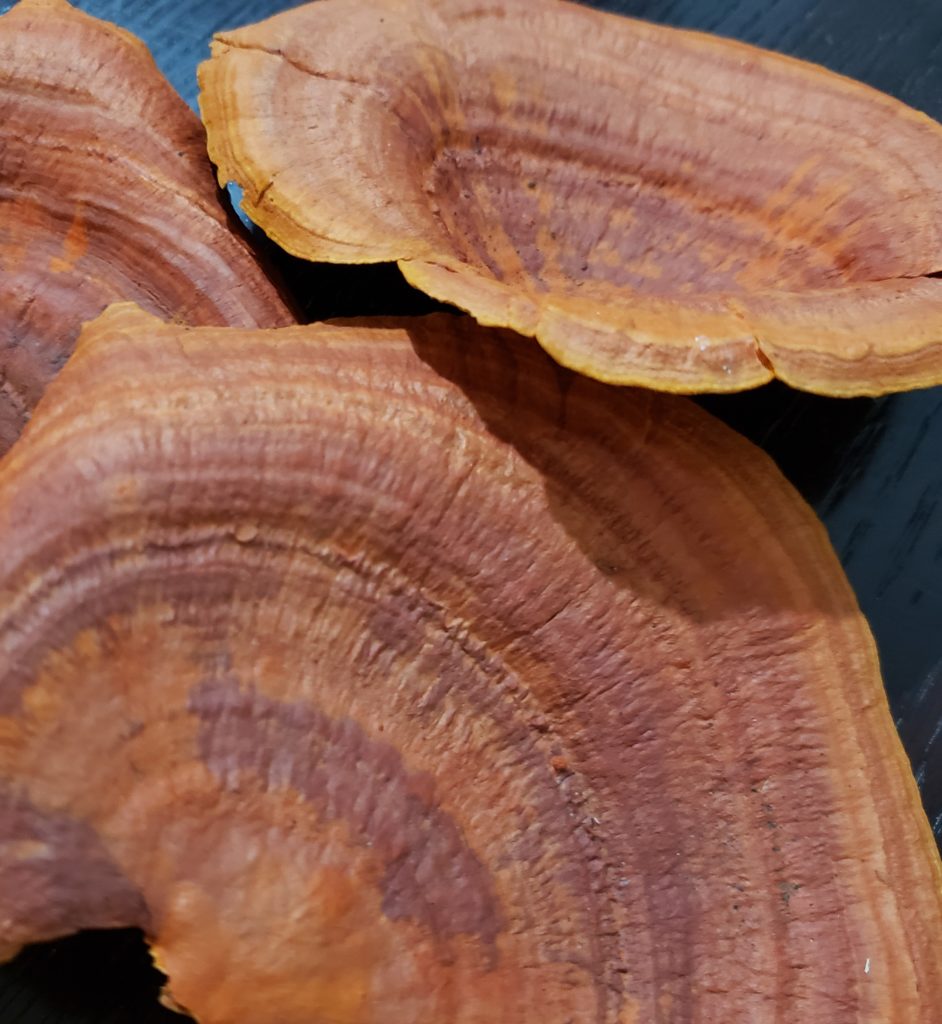
Despite the dangers that come from ignorance or misidentification, mushroom foraging and dying can be incredibly satisfying. Some dye mushrooms, like the Phaeolus schweinitzii – commonly called Dyer’s Polypore – can produce a variety of colors from pale to golden yellow to olive green, depending on the mordant used. Such a range from one mushroom encourages experimentation.

Hydnellum peckii, which I’ve only seen in person in the Smokies, looks like a bloody Halloween prop when young but will give you a beautiful blue, though the weight to fiber ratio is high, so you have to find and save up a lot to make good color.

Hydnellum Peckii. Photo Credit: Bernypisa [CC BY-SA 3.0], via Wikimedia Commons

Hydnellum are toothed mushrooms, which interests me because a Mycopigment expert I met in Oregon once told me that any toothed mushroom that I find will likely give dye. She also told me that mushroom dye will only fix to protein fibers because they are more closely related to animals than plants – and I’ve since discovered that this is not true – so I take anything I learned from her with a grain of salt. However, in my own research, I’ve found evidence suggesting that there are no deadly or significantly toxic species of toothed mushroom, so I feel pretty comfortable experimenting with this family despite not being able to accurately identify them. Thank god the mushroom I inadvertently snorted was toothed. As it sits in its solar dye bath in my back yard, it looks to be a rather strong brown dye.

Featured front, the offending dusty mushroom, improperly stored by yours truly

It’s also unlikely that a polypore will kill you, though they can make you quite ill (again, if ingested), so I feel fairly comfortable with collecting those. It’s the gilled mushrooms that you really want to be careful of, but unless you know what you’re looking for, there’s really no sure and fast way to tell. I quite liked this person’s take on poisonous mushrooms. For the gilled ones, I like to do what I can to get a second opinion.

Lichens are also often good dyers, though certain species are also toxic. However, there are definitely some varieties, like Evernia prunastri, that will give a beautiful purple dye if fermented in ammonia properly first. There are tests one can do with an aqueous solution of potassium hydroxide (KOH) to check if the lichen is a purple dyer – and it is best to properly check first, because the process is a time consuming and smelly one to get wrong. KOH will also help in the identification of mushrooms.

I’ve been told that both Phaeolus schweinitzii and Pisolithus tinctorius (dark browns) grow in Puerto Rico where there is pine. I’ve heard rumors of people looking for Trametes versicolor (bluish-greens), but they most often find other Trametes varieties. Personally, I’ve only identified one dye mushroom here with certainty, the Pycnoporus sanguineus, which grows with abandon very near my home. I’m looking forward to the light golden brown I’ve been promised with that one.

Pycnoporus sanguineus, a dye mushroom that grows prolifically in my neighborhood
The Pycnoporus proved a better choice for solar dyeing

Stay safe, happy experimenting, and don’t go snorting any mystery mushroom dust.

Resources:

The Rainbow Beneath My Feet: A Mushroom Dyer’s Field Guide by Arleen Rainis Bessette and Alan E. Bessette

https://www.mushroomexpert.com/major_groups.html

https://www.mycopigments.com/blogs/news

Lifelines and Lace Surgery,
or Knitting is Cheaper than Therapy

Swatch for a shawl in the Estonian Cube with a Spruce pattern, using Ito Niji yarn. Note the wonky nuups.

I think the number of mistakes I’ve made in my final edging piece of this Haapsalu shawl are a sign of how over this project I am. Now, this is my first true fine lace project, my first experience with nuups, and my first time diving deeply into the culture and history of Estonian lace, and I’ve truly enjoyed knitting this piece. Okay, so maybe I’m not a fan of nuups.

This is where I began, and it is evident that I struggled with those nuups from the start.

I still don’t even know where I went wrong with them. However, in my actual piece, each one was carefully and thoughtfully made, and so each one is fully formed. A true success, albeit one that took me twice as long as an un-nuuped version to achieve.

So, that’s not where my difficulty has been. No, what I’ve learned through this project is that I know nothing about how actual stitches work. You see, I’ve been knitting since I was six (30 years), so it’s just second-nature in a way that speaking English is second-nature for me. Early in this project, I would try to describe to myself or envision how I form a knit stitch – how I hold the thread, how I insert the needle – and I just couldn’t do it. But stick some needles in my hand and I could do it blindfolded. And I don’t struggle in the least to learn new knitting techniques. If someone shows me something once, I pick it up, but I would find it extremely difficult to then explain that same concept to someone else. It’s a strange thing to realize that I can’t discuss the mechanics of something I could do in my sleep.

Now, I don’t often make (knitting) mistakes and I’m a complete perfectionist, but in fine lace one tiny error could result in me losing hours and hours of work because I just didn’t know how to fix them in fabric that intricate. And this was wholly because of my ignorance of stitch structures and relationships, particularly the decreases.

Enter Facebook Groups, YouTube, and Craftsy.com (formerly Blueprint, formerly formerly Craftsy). Once Facebook fell out of favor for witty quips and beautiful photos, I stumbled upon this rise of the Facebook Group and promptly joined six or seven communities devoted to various fiber arts. There is considerable overlap in membership, so I see the same faces across subjects and I love knowing that other people are just as thrilled by all things fiber as I am.

As a newly obsessive fine lace knitter, one of my favorite groups is focused on the lovely art of Shetland lace, and it is here that I have learned the most about the frustrations of dismantling 12 hours of work in 15 minutes at 3:00 a.m. They taught me why they call it “frogging” (because you “rip it, rip it”); they taught me why they call it “tinking” (tink = knit backwards). They taught me that I can fix minor mistakes without frogging or tinking anything, but that completely dismantling a work to fix a mistake is something that everyone experiences, and accepting a mistake and/or fixing it in finishing is also a valid solution. Thank god they taught me what lifelines are.

Lifelines are literal lifelines.
Lifeline insertion can be as easy as threading a hole.

Some YouTube videos later, and I discovered how easy it is to put in a lifeline using the little tightening holes that come on interchangeable needle sets. Some videos show how to do it with a needle and thread, and if this is how you do it, I understand why you don’t do it often. But with interchangeable needles, you simply thread the hole with your lifeline string and knit as usual, pulling the string through at the end of the row, and voilà! One painless lifeline. It’s so easy that there’s literally no reason to not do it in lace. I even hate knitting with circular needles, so I’ll switch to one every twenty rows or so just to insert my next lifeline (and no, you can’t tell).

But, you see, I would get cocky. I would think to myself, “I haven’t made a mistake in weeks – I can make it another 20 rows without another lifeline,” and then 7 stiches before the end of my lifeline row I would slip and drop three stitches, and that would be the end of that. I would try to fix it, I would, I swear! But I would twist my stitches, or I’d drop more, so I’d pull out my needles and start pulling away at 6,000 stitches because once the mistake involved more than just a simple missing yarn over or a dropped knit stitch, I just couldn’t fix it without scrapping everything down to the last lifeline.

After a good frogging…

Just as in life, knitting mistakes happen; and, just as in life, it’s important to know how to fix your knitting mistakes when you make them. Just as in life, I’m not the best at fixing my knitting mistakes when they happen and where they are. It’s a skill one must learn through trial and patience; and so, when the opportunity arises, I always make my best attempt to repair what I’ve done. Unfortunately, more often than not, I would end up making it worse – just as in life.

Until recently. I’m not sure what changed, but maybe the Craftsy videos started to sink in. I got a premium membership on discount – unlimited videos for $40 (and no, I don’t get paid to promote them) – and found that their content is super helpful for people at all levels. So, I started to watch some content on new techniques, and a lot of their classes begin with a lesson on stitch structures. For someone who has never even thought about what direction a stitch should face, these videos helped me process things that I’ve basically been doing since before I was conscious.

The most helpful of these videos for me has been “Save our Stitches: Fixing Lace Knitting Mistakes” with Laura Nelkin. She does a segment on “Lace Surgery”, and boy, did it change my life. I had to watch it twice, two months apart, for it to sink in, but I don’t think I’ll ever have to frog again.

My edgings have 685 stitches each, and there are two. With the first one, I’d gotten to row 8 of 18 and dropped a few stitches while tired one night. I fixed it, but it didn’t look right, and so I tried fiddling with it again and I made a hole, and the hole got bigger and bigger, and – crying – I pulled out days of work and started again. I’m now on the second one. It’s the home stretch. I’m almost done with this damned scarf I’ve been knitting since April that’s longer than I am tall.

My lace pillow tilts and rotates, which is handy. I pinned white paper to it, as my current project is also green.

And again at row 8, I slipped and lost six stitches. They laddered down, and I caught them at row 4. Again, I cried. Again, I fixed it, but it didn’t look right. I talked to my husband. He said leave it, that no one would notice, but my OCD won’t allow for that. I could maybe leave a twisted stitch or some wonky tension, but I had a twisted row. There had to be another way. Again, I watched that video on lace surgery – and would you believe it, this time something stuck. The key is having something good to pin it to. This is not a handheld activity. I used a bobbin lace pillow that has never been used for bobbin lace.

My first attempt at surgery worked fine enough, but it wasn’t perfect. Somehow I missed a stitch, but I didn’t notice until the return row. So I did a second round of surgery. I couldn’t breathe as I pulled out those stitches and knitted them up again. I found it easiest to dismantle the stitches between two knitted columns in my pattern (non-inclusive) so I would have an intact knit stitch on either side in each row as reference.

Repairing 4 rows, a row at a time.
Obviously, the repaired version is on the left, but I’m hoping it won’t be so obvious after blocking.

As you can see, surgery really distorts things, but in comparing the rebuilt pattern with an intact version, the only difference I can really see is in the tension. I’m hoping that I can move things around in there while it’s blocking, and I’m convinced that it won’t be visible in the final. OCD satisfied. Another thing to note is that my two surgeries cost me an hour, whereas starting over probably would have cost me 8.

My journey through fine lace has been truly educational. The way that I knit has taught me so much about how I, myself, can handle life when it goes wrong. When knitting, I don’t leave any mistake unaddressed, I fix the minor ones a row or two down without much effort and I move on, and I breathe through the frogging of major ones and let those hours of work go (265 hours and counting, can you believe it?) – because the journey is the point. I’ve learned to put in those lifelines more often, especially when things are going well, just to be prepared for when they are not. I’ve learned to be patient and kind to myself, and I’m getting better at repairing those mistakes every day. My reward is flawless, delicate work that I can be proud of.

Now, to apply this to my non-knitting life…